
**Updated 3/7/21 to include custom configs that override openvpn defaults that are not configurable by default in pfSense GUI**
I recently needed to setup a VPN to allow a small business to have employees and contractors connect to their local network remotely. Here is a summary of the setup process using pfSense and OpenVPN.
- Hardware / Software Selection
- Installation
- pfSense Configuration
- Create Certificates
- Configure VPN
- Create Users
1) Hardware / Software Selection
The first item to resolve is selecting hardware and software solutions. This really depends on a number of factors including size of your network, amount of traffic, number of remote users, and budget. I a fan of the small form factor hardware firewall running pfSense, but there are a number of options. Lawrence Systems has a good overview of these options here, but I'll be talking about pfSense software with netgate or protectli hardware today.2) Installation
Regardless of the chosen hardware the pfSense docs should guide the software installation which is much like any other *nix OS install. Keeping default settings on the installer screens should be sufficient for most.Once you finish loading the pfSense OS you'll find a screen similiar to the one pictured below.

The two most important options at this phase are "2) Set interface(s) IP address" and "3) Reset webConfigurator password".
- Use option 2 to configure your WAN and LAN IP addresses.
- Use option 3 to return to the default admin password (pfsense) if you ever lose your password.
- WAN (igb0) = 192.168.1.24
- LAN (igb1) = 192.168.2.1/24
I obtained my WAN IP from DHCP just like I would have if I was connected to my modem and grabbing a public IP from my ISP. (We can ignore static v dynamic IPs for now, but pfSense will support both)
3) pfSense Configuration
After completing the installation, we'll need to log in and do some basic system configuration. The initial login wizard should guide most of this, but in case you blew by that too quickly you can also navigate to System > General Setup to cover the main points.In the system section, you'll need to select a hostname and a domain. Any values will work here. You don't need to go buy a domain name to complete this setup. Something like a hostname of test and domain of test.com is sufficient, but try to be more creative!
You can leave everyting in the DNS Server Settings section blank if you choose, but I prefere somethign like the following

Unchecking DNS Server Override simply prevents your ISP from taking over here.
In the Localization section, you'll want to pick a timezone (UTC is helpful if you plan to aggregate logs)
Everything else can stay as default for now.
Make sure to find the green save button before moving on.
4) Create Certificates
Navigate to System > Cert. Manager and find the CAs tab
From here we can create our VPN root certificate.

- Descriptive Name: My Root CA for VPN (or any name you choose)
- Method: Create an internal Certificate Authority
- Key length: 4096
- Digest Algorithm: sha256
- Common Name: MyRootCA
Navigate to System > Cert. Manager and find the Certificates tab
From here we can create our VPN server certificate.
Add/Sign a new certificate section
Add/Sign a new certificate section
- Descriptive Name: VPN Server (or any name you choose)
- Method: Create an internal Certificate
- Certificate Authority: MyRootCA
- Key length: 2048
- Digest Algorithm: sha256
- Common Name: vpn-server
- Type: Server Certificate
Once we have a root CA and a server certificate we are ready to create a OpenVPN server.
5) OpenVPN Configuration
Navigate to VPN > OpenVPN and find the Wizard tabUser Auth section:
Select local user access for 90% of installs. Unless you want to integrate with an existing LDAP or have more than a few users to manage this will work fine
Next.
CA section:
Select MyRootCA (or whatever root CA you created in step 4)
Next.
Server Certificate section:
Select vpn-server (or whatever VPN Server cert you created in step 4)
Next.
Server Setup section:
This is the core section so take your time and make sure everything is correct here. Reference pfSense docs as needed.
- General OpenVPN Server Information
- Keep defaults and add a description.
- Cryptographic Settings
- TLS Authentication: Check
- Generate TLS Key: Check
- DH Parameters Length: 2048 (or greater if clients support)
- Encryption Algorithm: AES-256-CBC
- Auth Digest Algorithm: SHA256
- Hardware Crypto: This will depend on your hardware.
- If an accelerator is present than follow instructions on pfSense docs
- otherwise select No Hardware Crypto Acceleration.
- Tunnel Settings: (see notes below this section for assumptions)
- Tunnel Network: 192.168.9.0/24 (or whatever range you'd like to save for VPN clients)
- Redirect Gateway: checked
- Local Network: 192.168.2.0/24
- Concurrent Connections: 5
- Compression: Omit (Use Default)
NOTE: This will result in the following behavior, but can be changed to suite your needs.
- VPN clients will get IP's in Tunnel Network Range.
- All traffic on VPN client will go through the VPN (because redirect GW is checked)
- No more than 5 VPN clients can be active at same time
- LAN is assumed to be 192.168.2.0/24 and pfSense LAN IP is assumed to be 192.168.2.1
- Client Settings:
- Dynamic IP: checked
- Topology: Subnet
- DNS Server 1: 192.168.2.1 (see notes above)
- Other options can remain as default
- Firewall Rules:As netgate docs say "check both [boxes] unless the rules will be managed manually."
- Firewall Rule: checked
- OpenVPN Rule: checked
Finish.
**Updated 3/7/21
Now we have a fully configured OpenVPN Server, but we will re-open to tweak the TLS settings by navigating to via VPN -> OpenVPN and double clicking on the server we just created. Once in the edit form scroll down until we find Advanced Configuration and Custom Options. Because OpenVPN defaults to TLS 1.0 with never expiring auth tokens, we want to add the following config option in Custom Options to reject insecure TLS versions and limit token lifespan.
tls-version-min 1.2
auth-gen-token 28800 # 8 hours in seconds
For additional assurance we can also consider adding the following custom options. See OpenVPN docs, for more details
dh none ### restricts standard diffie helman and forces elliptic curve diffie helman
user nobody ## tell tunnel process to run as nobody user
group nobody ## tell tunnel process to run as nobody group
At this point we should have a OpenVPN server running on our firewall and are almost ready to test it out.
On my lab setup, there is one more server setup step that is needed to ensure I can connect to this chained private network from my main LAN. Because my VPN request will originate from an IP in the range of 192.168.1.0/24 (what my server sees as WAN) it will actually be blocked by pfSense firewall. To remedy this, I need to disable a default firewall rule. Only do this next step is your have a dual firewall setup where WAN is not pointing to the public internet. Otherwise move to step 6.
- Navigate to Interfaces > WAN and scroll all the way to the bottom
- Find Block private networks and loopback addresses and ensure it is not checked
- Save.
6) Create Users
Before we can test our setup we will need to create a user account.
Navigate to System > User Manager and find the Groups tab
Create a new group:
- Name: VPN
- Scope: Local
- Description: Users who will use VPN
Navigate to System > User Manager and find the Users tab
Create a new user:
- Disabled: unchecked (checking this will prevent your user from connecting)
- Username: user1
- Password: choose a good passphrase
- Full Name: user1
- Expiration Date: leave blank or set a date that the account will stop working. I chose 2 weeks in the future for my test account.
- Group Membership: ensure this user is only in the VPN group.
- Certificate: checked
- Descriptive Name: user1 VPN Cert
- Certificate Authority: MyRootCA
- Key Length: 2048
7) VPN Client Setup
To connect from a remote network the client computer will need to be configured with a VPN client. I'm using a windows 10 laptop, but other operating systems should be very similiar.
Navigate to System > Package Manager and find the Available Packages tab
Find and install the openvpn-client-export package
Navigate to VPN > OpenVPN and find the Client Export tab
- OpenVPN Server
- Remote Access Server: Select VPN Server we just created
- Client Connection Behaviour
- Host Name Resolution: For now I am using Interface IP Address, but other settings may be needed for public internet access without a static IP (details).
- Block Outside DNS: checked
- Keep all other settings default
Scroll to OpenVPN Clients section and find user1
Select/Download Current Windows Installer (10/2016/2019)
On the client computer, run the installer.
If a blue windows defender pop up is displayed


If a blue windows defender pop up is displayed
- select more info
- confirm filename matches downloaded installer
- select run anyway
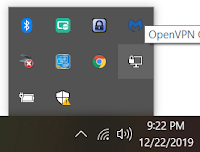
Once OpenVPN GUI is installed and launched, right click on the OpenVPN icon in taskbar

Select the user1-config and connect in order to log in

If all goes well you should see a confirmation after entering valid credentials

Now we are connected and should be able ping the VPNs local gateway (192.168.2.1) and other systems on the VPN LAN. In fact, all traffic should be going through the VPNs LAN.
Comments
Post a Comment